Tire valve stems are the valves located in a vehicle’s wheel where the tires are inflated from. They contain a spring loaded valve core that seals itself using the air pressure inside of the tire. Over time valve stems may get old, crack, become brittle, or begin to leak, causing larger problems with your tire and your driving experience.When valve stems begin to leak, the tire will no longer hold air. Depending on the severity of the leak, the tire may leak air slowly, or in more sever cases not hold air at all, warranting replacement of the valve stem.In most cases the the fastest way to replace a valve stem is to take it to a tire shop and have them remove the tire and replace the valve stem using aid of a tire machine. However, for instances where this is not an option, a tire can be removed and the valve stem changed manually. In this step by step guide we will cover how to remove a tire from a wheel manually, using a tire iron, to replace the valve stem.

Part 1 of 1: How to replace a valve stem
Materials Needed:Air compressor with hose,Jack,Jack stands,Lug nut wrench,Needle nose pliers,Tire iron,Valve stem removal tool
Step 1: Loosen the lug nuts. Loosen the lug nuts of the wheel from which the valve stem is going to be replaced.
Step 2: Raise the car on jack stands. Set the parking brake, and then raise the vehicle and secure it on jack stands.
Step 3: Remove the wheel. Once the vehicle is raised, remove the wheel and set it flat on the ground with the outside of the wheel facing up.
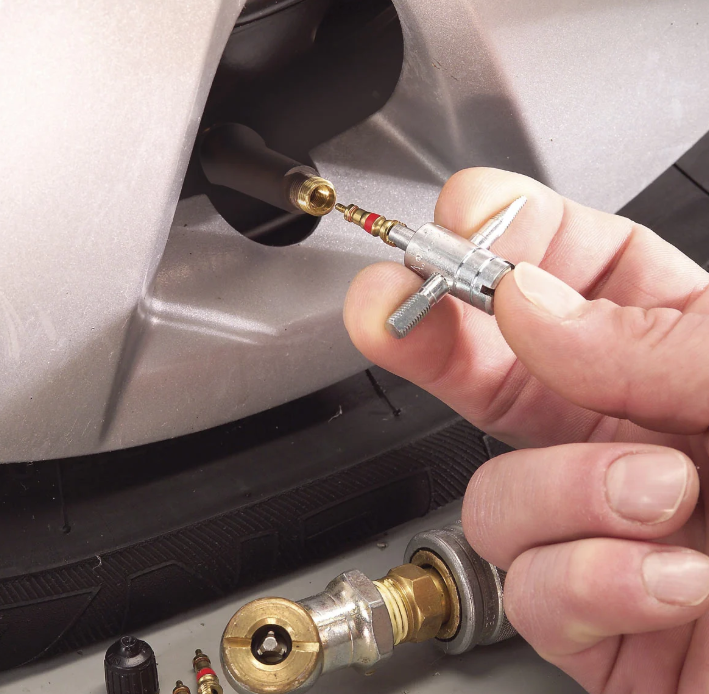
Step 4: Deflate the tire. Remove the cap from the valve stem, and then remove the valve stem core using the valve stem removal tool to release the air from the wheel.
Once the valve stem core is removed the tire should deflate on its own.
Step 5: Separate the tire’s bead from the wheel. Next, use the sledgehammer to break the tire’s bead free from the wheel.Hit the sidewall of the tire using the sledgehammer in the same place until the bead breaks loose.When the bead breaks loose you may hear a crack or popping sound, and you will see the inside lip of tire visibly separate from the lip of the wheel.Once the bead has been broken, continue around the tire with the sledgehammer until the bead is completely broken all the way round the tire.
Step 6: Lift the lip of the tire up from the wheel. Once the tire’s bead has been broken, insert your tire iron between the edge of the rim and the inside lip of the tire, and then pry upward to pull the lip of the tire over the edge of the wheel.Once you have pulled the lip of the tire over the edge of the wheel, work the tire iron around the rim until the entire lip of the tire is off the rim.
Step 7: Remove the tire. Grab the tire by its removed lip and pull it upward so that the opposite lip that was at the bottom of the wheel is now touching the top edge of the rim.Insert the tire iron in between the the tire’s lip and the edge of the wheel and pry upwards to pull the lip over the edge of the rim.Once the lip is over the edge of the rim, work the tire iron around the edge of the wheel until the tire is removed from the wheel.
Step 8: Remove the valve stem. Once the tire is removed from the wheel remove the valve stem. Use the needle nose pliers to pull the valve stem free from the wheel.
Step 9: Install the new valve stem. Take your replacement valve stem and install it from the inside of the wheel. Once it is in position use the needle nose pliers to pull it through into place.
Step 10: Reinstall the tire. Reinstall the tire onto the wheel by pressing it down over the the rim until the bottom bead clears the edge of the rim.Then press the side of the tire down underneath the edge of the wheel, tuck your tire iron in between the lip of wheel and the bead, and then pry the bead over the lip the of the wheel.Once the bead clears the lip of the wheel, work your way round the entire wheel until the the tire is completely installed on the wheel.
Step 11: Inflate the tire. Once the tire has been re-installed onto the wheel, turn on the air compressor and inflate the tire to the correct specification.For most tires, the recommended pressure is between 32-35 pounds per square inch (psi).
Tip: For more information about inflating a tire, read our article “How to Add Air to Your Tires.”
Step 12: Check for leaks. Once the tire is properly inflated, double check to make sure that there are no leaks of any kind, and then reinstall the tire onto the vehicle and lower it off of the jack stands.For most cases, the easiest course of action to replace a valve stem would be to simply take it to a tire shop, have the tire removed with a machine, and then have the valve replaced.


